In Part 1 of our multi-part post, I walked you through adding custom steps to a Tekton pipeline. In this post I’ll show you how you can append custom steps to a defined Stage. I will also show you how to override an entire Build-Pack defined pipeline (the ones that come out of the box in Jenkins X), including the ability to specify your own Builder Docker Image.
Bonus I show you how to retrieve Kubernetes Secret values and store them as a variable within the pipeline.
For details on the Jenkins X Pipelines that use Build-Packs (which are the default), take a look at Customizing Pipelines
I won’t go into details as to what Tekton is, as I provided an overview in Part 1. This post builds on top of what we did on Part 1, please read it as many typical commands are ommited on this post (viewing jx logs etc.)
Scenario
I previously installed Jenkins X Serverless on GKE and all is running. I have an existing NodeJS application that has MochaJS tests, and I’ve already ran it through Jenkins X CI/CD. My app tests ran, and I did absolutely nothing, as Jenkins X detected the NodeJS language, and used the appropriate Builder. The app current version is in our staging environent.
However, I want to further have control over the Jenkins X pipelines which use the build-packs. I also want to see how I can completely build my own pipeline without relying on the ones provided by Jenkins X.
What you will learn
In the second part of this series, I will walk you through the following:
- Append an additional two steps to the given built-in Release pipeline, within the Build Stage. Adding a step before and after the build occurs.
- Override the entire
Build-Packbuilt-in pipeline with my own definition. (this of course means more work for me)
So let’s get started!
Append Steps To The Release Pipeline Build Stage
First, I will modify the jenkins-x.yaml file. In order to do that, I will execute a jx command as follows:
> $ jx create stepI answer the questions related to where I want to add the step. The last prompt is actually a shell command. But I just type whatever as I need to properly define it later.
Once finished, the jenkins-x.yaml file is immediately modified. It should look like the following:
buildPack: javascript
pipelineConfig:
  pipelines:
    overrides:
    - pipeline: release
      stage: build
      type: after
      steps:
        - sh: echo ====================================== APPENDING  Release Pipeline, Build Stage, Before execution of default stuff ======================================
          name: sposcar-appending-step
You can add additional steps as well, as the steps node is an array. You may also opt to add another step at a diffrent time, perhaps in the type: before vs the type: after as I did and below is the final yaml
buildPack: javascript
pipelineConfig:
pipelines:
overrides:
- pipeline: release
stage: build
type: before
steps:
- sh: echo ====================================== PREPENDING Release Pipeline, Build Stage, before execution of default stuff ======================================
name: sposcar-prepending-step
- pipeline: release
stage: build
type: after
steps:
- sh: echo ====================================== APPENDING Release Pipeline, Build Stage, after execution of default stuff ======================================
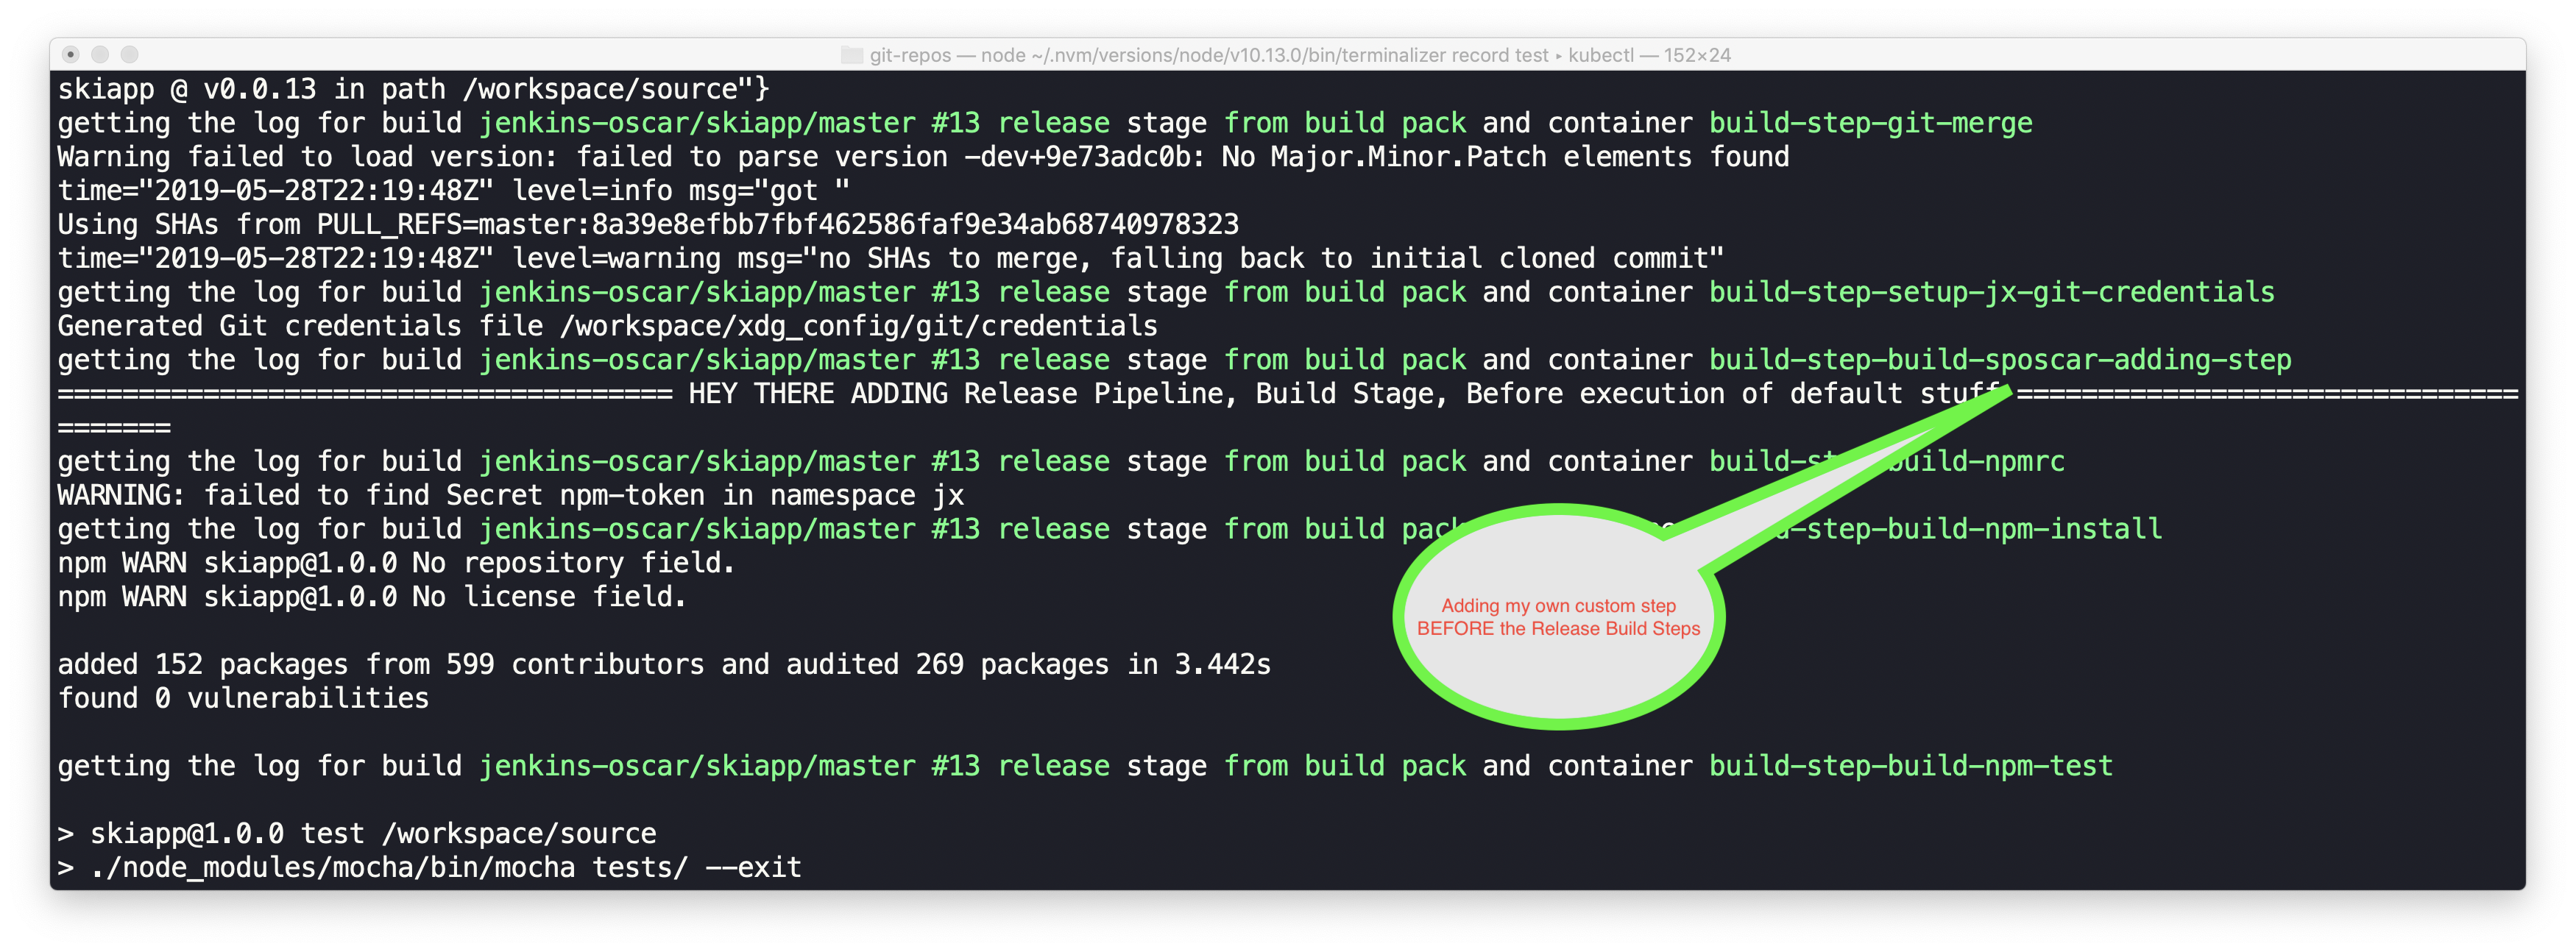
name: sposcar-appending-stepChecking the build logs
Once I run the pipeline, the custom steps should be executed, and should appear in the output as shown below.
Replacing the built-in Pipeline
Because Jenkins X uses build-packs to build an app based on the language, it automatically detects this when you import your existing app. Therefore, the first line already containted buildPack: javascript. Jenkins X added this for me automatically.
However, in this scenario, I do not want to use the buil-in pipeline, nor do I need to overwrite any steps. I want to completely define my own pipeline. This step shows you an example of what that may look like.
The yaml for the entire replacement looks like the following:
buildPack: none
pipelineConfig:
  pipelines:
    release:
      pipeline:
        options:
          containerOptions:
            resources:
              limits:
                cpu: 0.2
                memory: 128Mi
              requests:
                cpu: 0.1
                memory: 64Mi
        agent:
          image: sharepointoscar/node:8
        stages:
          - name: Oscar Build Stage
            steps:
              - name: Get Node Version
                command: node
                args:
                  - --version
              - name: NPM Installar Por Favor
                command: npm
                args:
                  - install
            options:
              containerOptions:
                resources:
                  limits:
                    cpu: 0.4
                    memory: 256Mi
                  requests:
                    cpu: 0.2
                    memory: 128Mi
          - name: Oscar Test Stage
            steps:
              - name: Run MochaJS Tests
                command: npm
                args:
                  - test
            options:
              containerOptions:
                resources:
                  limits:
                    cpu: 0.4
                    memory: 256Mi
                  requests:
                    cpu: 0.2
                    memory: 128Mi
Lots going on here. First, you will notice that the first line, tells Jenkins X to not use a buildPack.
You might notice that I specified container properties and modified them. I am telling Jenkins X that I need specific cpu and memory for the containers it spins up to run the Tekton pipeline.
Another noteworthy item, is that I’m using a custom Docker image, in this scenario my app required a specific version of NodeJS, and it was not available in the existing Jenkins X repo (a common scenario), therefore the agent.image allows me to point to an image (this one is publicly available) and I host it at Docker Hub
Working With Secrets and Private Registries
If your registry is private (most are), then you will need to first create a Secret in Kubernetes. I prefer using a command similar to the following:
kubectl create secret generic my-registry --from-literal=username=userarealname--from-literal=apikey=passwordOrAPIKey --namespace jx
Once this is created, you can use use the pipeline env node to set values from the secret stored in Kubernetes, which you retrieve as shown below.
NOTE the sample yaml below is not the same as the complete pipeline I defined above. I am merely showing you, how you may retrieve secrets and use them within the pipeline.
buildPack: javascript
pipelineConfig:
  env:
  - name: MY_REGISTRY_USERNAME
    valueFrom:
      secretKeyRef:
        key: username
        name: my-registry
  - name: MY_REGISTRY_APIKEY
    valueFrom:
      secretKeyRef:
        key: apikey
        name: my-registry
  pipelines:
    overrides:
    - pipeline: release
      stage: build
      type: before
      steps:
        - sh: echo ====================================== MY_REGISTRY_USERNAME= ${MY_REGISTRY_USERNAME} ======================================
          name: sposcar-echo-username
        - sh: echo ====================================== MY_REGISTRY_APIKEY= ${MY_REGISTRY_APIKEY} ======================================
          name: sposcar-echo-apikey
You will also notice that my steps have unique names. This is helpful when looking at logs to quickly spot them. For example, if I vew the app activities using jx get activities -f skiapp -w, or if you use jx get build logs at the time the pipeline is executing, this proves to be really helpful.
NOTE
Many people are confused when they execute jx get build logs and see a message like the following: error: no Tekton pipelines have been triggered which match the current filter This just means, the pipeline either has not started or never started. I tend to forget to do a Pull Requests to kick it off. Another thing you can do, is check other logs by using jx logs and picking an item such as the pipelinerunner or pipeline which tend to have more insight as to what happened when you ran it.
Part 3 and 4?
There are pipelines in Jenkinx X that are not based on Build-Packs. We have not covered those. If you show enough interest via Twitter (Retweets and Likes) when this blog is posted, I’ll take the time to write a Part 3 and Part 4 which show you how to work with these other type of Pipelines.
Conclusion
In Part 2 of of the Tekton Pipelines in Jenkins X blog post series, we learned how to add steps and augment the NodeJS build-pack Stages and Steps. We also completely replaced the pipeline with our own definition, and even added a custom builder docker image.
I hope you found this helpful.
Do you want to ensure you don’t miss posts like this? Sign up for the Jenkins X Newsletter!
More soon,