On the first part of our multi-part post, I walk you through adding custom steps to a Tekton pipeline. Part 2 focuses on overriding some steps at specific stages.
 Artwork depicts @bobcatwilson @jdrawlings.
Jenkins X can be deployed using several topologies. Two of the common ones are:
- Static Jenkins - which is used as the build controller
- Serverless - which uses Tekton Pipelines
-
Mixed - In this topology, you add Jenkins as an
appviajx add app jx-app-jenkinsand can choose per app where the pipeline should run!
We focus on the second topology on this multi-part post.
Scenario
We have installed Jenkins X on GKE and all is running. We have an existing NodeJS application that has some MochaJS tests, and we want to start putting it through Jenkins X CI/CD. Jenkins X will automatically run our tests (granted we specified this in the package.json via the npm test).
But we want to be able to add additional steps to our pipeline as well.
On this post, we walk through how to do exactly that.
Source Code
The NodeJS app I used for this post, is available at Github here. It contains a couple of simple MochaJS Tests, which are automatically tested. That’s right, you don’t have to do anything if that is all you need. This is due to the fact that we’ve indicated the npm test command within the package.json to use MochaJS.
About Tekton
If you have not heard, Tekton is an open source project which was started by Google and is now under the CD.Foundation along with Jenkins X.
Tekton is a powerful yet flexible Kubernetes-native open-source framework for creating continuous integration and delivery (CI/CD) systems. It lets you build, test, and deploy across multiple cloud providers or on-premises systems by abstracting away the underlying implementation details – cloud.google.com/tekton
Naturally, Jenkins X Serverless topologies leverage Tekton Pipelines.
Tekton pipelines are CRDs (Custom Resource Definitions) that run natively on Kubernetes. To help you understand this concept, here is a visual represention. The basic CRDs deployed when you install Tekton are as follows:
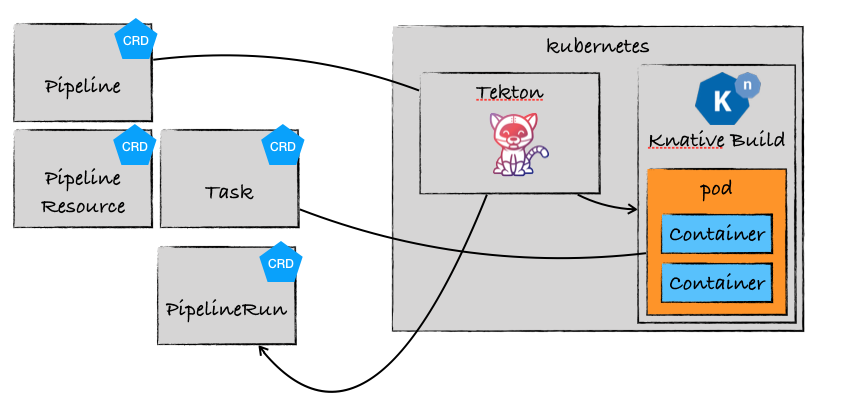
artwork by: @ndeloof
| CRD | Description |
| Task | sequence of containers and commands to execute |
| PipelineResource | git repository to checkout, Docker image to build |
| Pipeline | links all pipeline objects like Task and PipelineResource items |
| PipelineRun | manages execution and status of the pipeline |
A sample Tekton Task CRD looks like the following in Jenkins X
apiVersion: tekton.dev/v1alpha1
kind: Task
metadata:
  creationTimestamp: "2019-04-22T03:12:37Z"
  generation: 1
  labels:
    jenkins.io/task-stage-name: from-build-pack
  name: sharepointoscar-node-test-app-p-from-build-pack-3
  namespace: jx
  resourceVersion: "59937"
  selfLink: /apis/tekton.dev/v1alpha1/namespaces/jx/tasks/sharepointoscar-node-test-app-p-from-build-pack-3
  uid: 7b0052b1-64ac-11e9-90a1-42010a8a0027
spec:
  inputs:
    params:
    - default: 0.0.0-SNAPSHOT-PR-12-3
      description: the version number for this pipeline which is used as a tag on
        docker images and helm charts
      name: version
    - default: "3"
      description: the PipelineRun build number
      name: build_id
    resources:
    - name: workspace
      targetPath: source
      type: git
  steps:
  - args:
    - step
    - git
    - merge
    - --verbose
    command:
    - jx
 .......shortened intentionally
The pipelines are triggered by Prow Jobs, and run via a Docker Container on Kubernetes Pod.
Jenkins X Deployed Topology
For this scenario, we have deployed Jenkins X using the Serverless Topology to GKE.

artwork by: @ndeloof
using the following jx command:
> $ jx create cluster gke --default-admin-password=Password1 -n tektonoscar --ng=trueImport an existing project
Now that our cluster is up and running, we are ready to import an existing applicationm, and have it be promoted to the staging environment automatically.
NOTE
Each environent in Jenkins X can be configured to promote apps either Never, Auto or Manual. As shown below, the Staging environment is configured to automatically promote apps deployed there.
NAME       LABEL       KIND        PROMOTE NAMESPACE     ORDER CLUSTER SOURCE                                                                 REF    PR
dev        Development Development Never   jx            0
production Production  Permanent   Manual  jx-production 100           https://github.com/sharepointoscar/environment-jx-production.git       master
staging    Staging     Permanent   Auto    jx-staging    100           https://github.com/sharepointoscar/environment-tektonoscar-staging.git
To import our existing NodeJS app, I will run the following command within the root of my app directory:
> $ jx import .A lot happens when I do this, amongst other things, the Helm Charts are added to my Github repository so that moving forward, my app is versioned and deployed using Helm. Jenkins X also detects the language I am using, and it then selects a Build Pack, in my case it is the NodeJS one.
First Time Pipeline Run
When we import an app, Jenkins X will automatically run a pipeline and promote to staging. Shortly after, the app is available in said environment. Now our app is running on the staging environment, great!
Adding Custom Pipeline Steps
We are at a point where we can now add a custom pipeline step for our app.
NOTE
At the time of writing this post (and hence why it is part 1), one can only add a step, and not override steps. Part 2 of this post will walk you on doing that, when it becomes available, which is soon!
First, we need to tell Jenkins X that we want to add a step. To do that, we use the built-in CLI feature as follows:
> $ jx create stepThe terminal prompts for several things as follows:
-
First we must select the
pipeline kind, which is either Release, pullRequest or Feature. We select pullRequest because we want our steps to be triggered when a pull request is initiated. - Select the Lifecycle kind, we select postBuild
- Select Create Mode, options are pre, post and replace. We selected pre
- Enter the *command for the new step, this is a shell command.
This adds yet another file to our Github repository, it is the jenkins-x.yml in the root of our repository. This is the file that allows us to add additional Tekton pipeline steps, its contents should look like the following.
pipelineConfig:
  agent: {}
  pipelines:
    pullRequest:
      postBuild:
        preSteps:
        - name: sposcar-step1
          sh: echo "====================  CUSTOM STEP1 ===================="
        - name: sposcar-step2
          sh: echo "====================  CUSTOM STEP2 ===================="
We need to ensure that we create a Github Pull Request in order for our steps to be triggered, as we indicated this when building the custom steps.
Create Pull Request
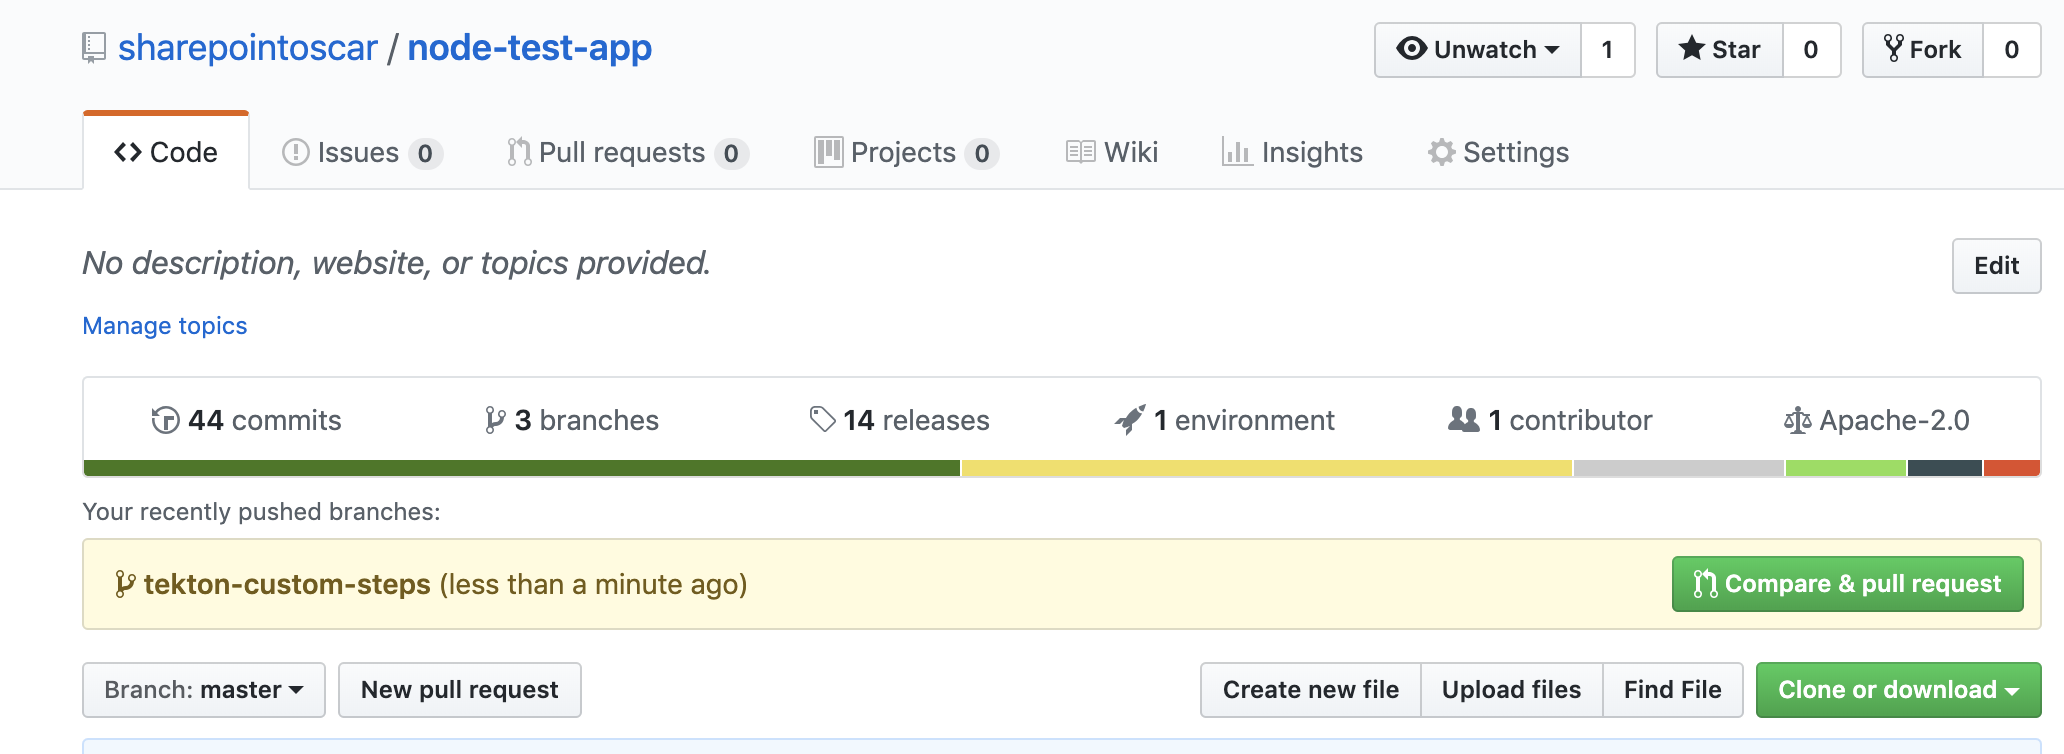
To create a pull request, lets create a feature branch on the node-test-app repo as follows:
> $ git checkout -b tekton-custom-steps
Switched to a new branch 'tekton-custom-steps'
Now we want to add our changes and check them in while on our new branch.
> $ git add . && git commit -m "added custom tekton step" > $ git push --set-upstream origin tekton-custom-stepsAt this point, we should see a pull request message on Github as follows
We create our pull request, and this triggers a build in the pipeline!
We can see that our custome steps are being executed as shown below.
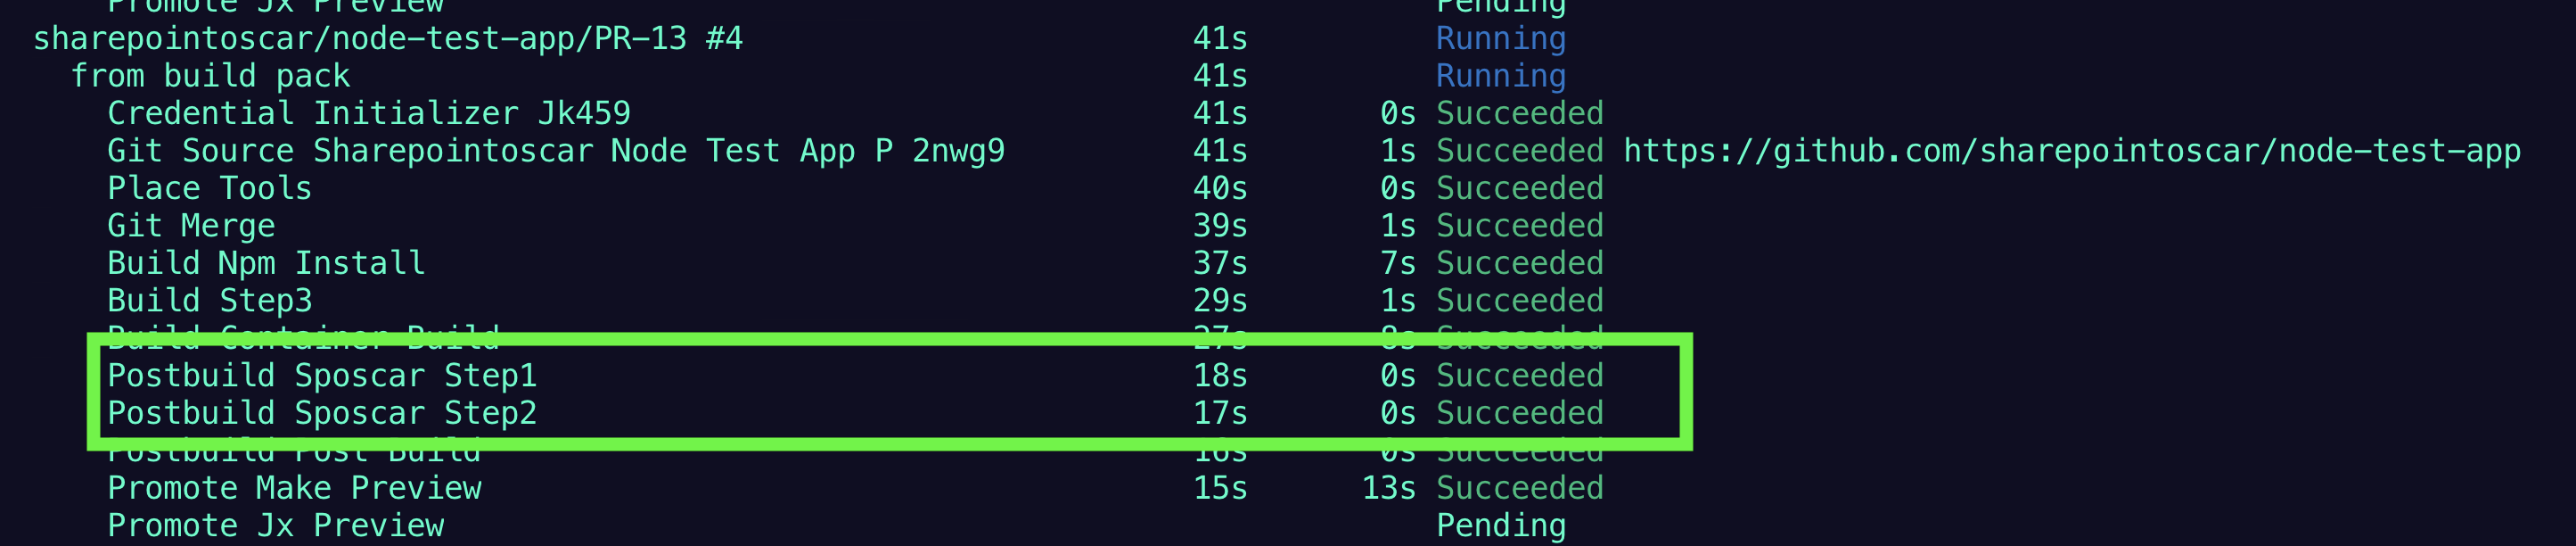
Furthermore, if we look at the logs by executing jx get build logs, it shows us the execution of our steps as well.
You will also notice that our custom step names are named, as per what we indicated in the yaml file.
NFO[0006] getting the log for build sharepointoscar/node-test-app/PR-13 #4 serverless-jenkins stage from build pack and container build-step-postbuild-sposcar-step1
====================  CUSTOM STEP1 ====================
INFO[0007] getting the log for build sharepointoscar/node-test-app/PR-13 #4 serverless-jenkins stage from build pack and container build-step-postbuild-sposcar-step2
====================  CUSTOM STEP2 ====================
INFO[0007] getting the log for build sharepointoscar/node-test-app/PR-13 #4 serverless-jenkins stage from build pack and container build-step-postbuild-post-build
{"level":"info","msg":"no CVE provider running in the current jx namespace so skip adding image to be analysed","time":"2019-04-22T19:41:21Z"}
INFO[0007] getting the log for build sharepointoscar/node-test-app/PR-13 #4 serverless-jenkins stage from build pack and container build-step-promote-make-preview
Preview PR Environment
At this point, the app has been deployed to a special temporary environment for folks to see changes in the app. This goes along well with the developer workflow in fact.
Any stakeholders can click on the PR link message that is shown below, to quickly see the app changes in their browser.

if all looks good, then our next step is for a reviewer to approve the changes by commenting with a /approve
The next thing that happens, is that our change is now in our staging environment.
Working with a Java Application
On our post we focused on putting a NodeJS application through CI/CD. Many folks use Java. There aren’t many differences in the process. To show you how this may work, we will create a Java application based on the appropriate Jenkins X QuickStart
Create a Java App based on a QuickStart
To create our application, we execute the following command on our terminal.
 >$ jx create quickstart

 Using Git provider GitHub at https://github.com
? Git user name? sharepointoscar


About to create repository  on server https://github.com with user sharepointoscar
? Which organisation do you want to use? jenkins-oscar
? Enter the new repository name:  javaApp


Creating repository jenkins-oscar/javaApp
? select the quickstart you wish to create spring-boot-http-gradle
Generated quickstart at /Users/omedina/git-repos/javaApp
### NO charts folder /Users/omedina/git-repos/javaApp/charts/spring-boot-http-gradle
Created project at /Users/omedina/git-repos/javaApp

The directory /Users/omedina/git-repos/javaApp is not yet using git
? Would you like to initialise git now? Yes
? Commit message:  Initial import

Git repository created
selected pack: /Users/omedina/.jx/draft/packs/github.com/jenkins-x-buildpacks/jenkins-x-kubernetes/packs/gradle

modified the helm file: /Users/omedina/git-repos/javaApp/charts/javaapp/values.yaml
replacing placeholders in directory /Users/omedina/git-repos/javaApp
app name: javaapp, git server: github.com, org: jenkins-oscar, Docker registry org: jenkins-oscar
skipping directory "/Users/omedina/git-repos/javaApp/.git"
Pushed Git repository to https://github.com/jenkins-oscar/javaApp
Making Code Changes
Pipeline Runs
Conclusion
We have walked through the process of importing an existing app, putting it through initial CI/CD and then adding custom Tekton Pipeline Steps. On our next post, we will go through overriding some or all of the steps.
For a great intro to Cloud Native CI/CD with Jenkins X and Tekton Pipelines, checkout the presentation here.
More soon,